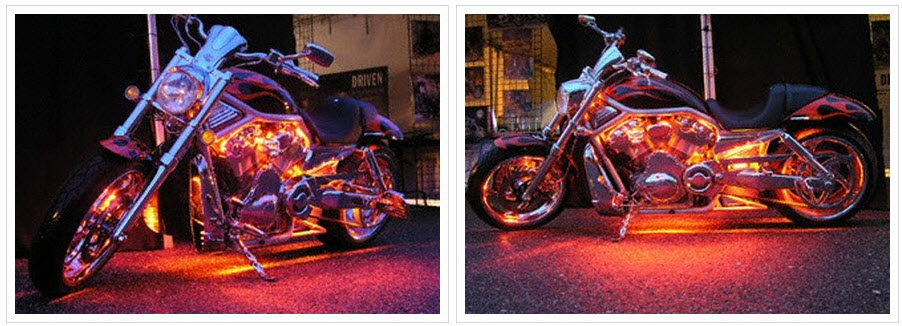
Here's an example of a Boogey Lights® installation on a VROD using our Cut-N-Click™ LED Lights. We were able to place 78 Cut-N-Click™ lights on the engine and an additional 18 lights behind the radiator to fill in the front of the bike. We also added an 18 light strip for ground effects. We unfortunately didn't take a photo of the finished bike so we have included a couple of stock photos to diagram the placement of the lights.
Unlike most other Harley models, a VROD requires you to cut your Cut-N-Click™ lights into a variety of segments to get the maximum light on your engine. Having these multiple segments also requires you to have more light wire leads. We used a separate lead for each segment put on the bike, all running back to the battery. We found it easier to run a lead to each segment rather than plugging one segment into another. There is not a lot of room on a VROD, so running a separate lead for each segment made things easier.

So here's the step-by-step process.
1. Undo seat and remove the cover on the “fake tank” on top of the bike.
2. Run a hot and ground wire from the battery in front of the bike to the pocket that sits underneath the seat. We ran all our wires from the lights to this pocket (this is also where we placed the remote control box). All of your wires will run underneath of the “fake tank” cover (there is plenty of room to have wires here).
3. Prep your bike by cleaning and promoting. (you can view diagram to see where to clean and promote).
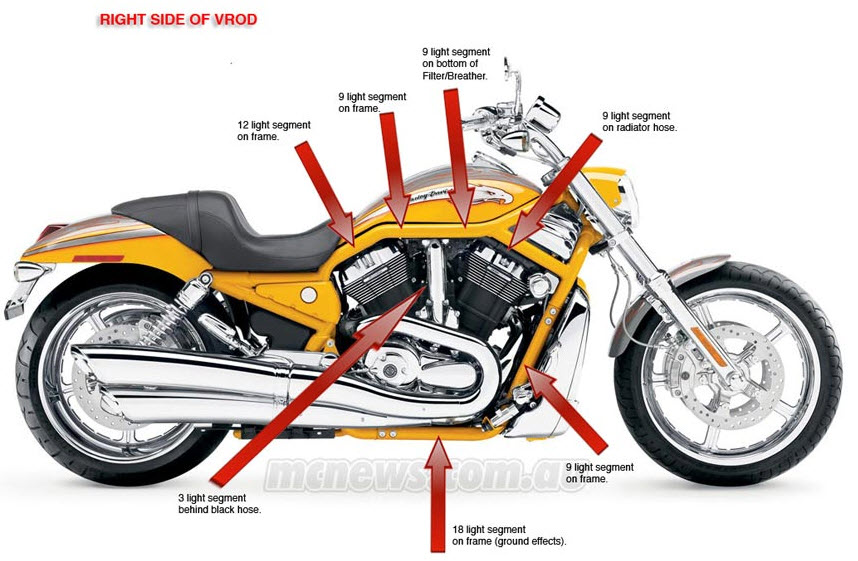
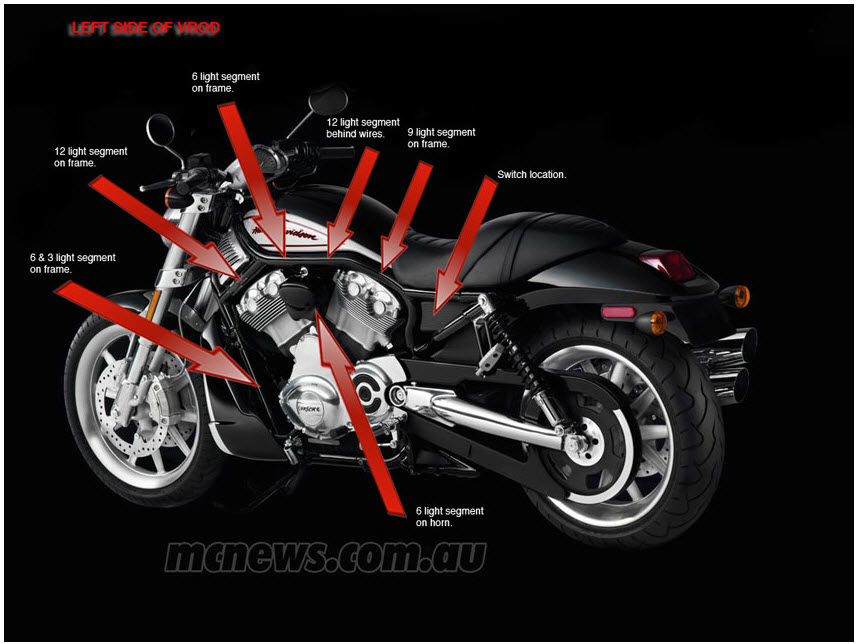
4. Cut your Cut-N-Click&trade lights into the various segments that you will need for the bike. Here is the diagram breaking down the placement we used.

Right Side of Bike
1- 12 light segment (placed on the main frame bar with lights shining down).
3- 9 light segments (one is placed on the main frame bar with lights shining down; second is placed flat on the bottom of the filter/breather with lights bended to shine down; third is placed on the radiator black hose with lights shining down).
1- 3 light segment (placed on the back of the black hose with lights pointed in towards the bike-this helps light up this dark spot).

Left side of bike:
1- 9 light segments (placed on the main frame bar with lights shining down).
2- 12 light segment (one is placed on frame bar with lights shinning down; second is places on back of wires with lights shinning down).
2- 6 light segment (one is places behind the horn with lights shinning down; second is place on frame bar with lights shinning down).
Behind radiator:
1- 3 light segment (placed on frame on left side of bike with lights pointed in).
1 – 6 light segment (placed on frame on left side of bike with lights pointed in – you can connect this segment to the 3 light segment with a small jumper).
1- 9 light segment (placed on frame on right side of bike with lights pointed in).
Ground effects:
1- 18 light segment (placed on frame on bottom of bike – bend every-other light to 45 degrees to get best effect).
5. Stick your lights to the appropriate location making sure you have your connectors plugged-in BEFORE sticking.
6. Run all of your leads back to the pocket under the seat, adding zip ties to make things neat and hiding the wires.
7. Add your switch to the left side of the black gas tank. You will find a nice flat surface there.
8. Connect your wires with the remote control and return “fake tank” cover and seat. (see instructions on boogeylights.com for wiring kit installation).
Enjoy the new look!
That’s a quick run through of how we did this installation. The main thing is to make sure you hide your lights and wires well. Put the lights up high and angle the light to the appropriate area of the bike you wish to illuminate. (you can gently bend the Cut n’ Click™ individual lights one time if you need to direct the light – this does come in handy).
Also, remember each bike may be a little different. You may be able to add more lights / or may have to remove some lights, depending on your bike. The instructions above are a general guide.
Thanks to http://www.mcnews.com.au for the use of their VROD picture.

