 Quick Shop
RV Turn Signal Add On Light Kit
Ever notice how difficult it is for drivers to see your turning indicator when they're immediately beside you? This product helps solve that problem. Our DOT Compliant Amber tri-chip LED strips are the perfect solution.
ADD TURN SIGNAL LIGHTS TO BOTH SIDES OF YOUR RV
These LED strips mount under your RV on both sides and connect to your RV's turn signals. They operate with your existing turn signals. This kit includes the lighting components necessary to install AMBER lights under each side of your RV on just about any style of RV: Class A, Class B, Class C, Super C, Fifth Wheel and Travel Trailer. We include the relays too necessary to safely connect the LED strips to your turn signals. Will not impact your RV's LCM (lighting control module). If you're looking for a way to make your turning signals easier to see for drivers on both sides of your RV, this is it.
We encourage you to take time to review the information we have assembled here before making your purchase decision. Be sure to scroll down, expand each text group section and read the information presented within each group. It's very thorough. Be sure to click on the INSTALL tab too. This is where you'll find downloadable INSTALL DOCUMENATION and WIRING DIAGRAMS for this kit. These materials contain important installation considerations.
FAQS | Frequently Asked Questions
While we encourage you to read all of the information presented on this product page (including the information on the navigation tabs), below are some of the most frequently asked questions we get about this product. In all cases, the answers to these FAQs will refer you to other sections of this product page for more details on the topic.
How difficult is this TURN SIGNAL ADD-ON Light Kit to install?
Regardless of the lighting configuration, you must have an understanding of 12vdc power. An essential skill with installation of any Boogey Lights® LED products is knowing how to correctly wire the product to a 12vdc circuit. This includes understanding the importance of having a properly sized fuse at the power source, polarity, how to properly seal an electrical connection, using properly sized wire gauge for the load, measuring voltage and measuring the additional amperage draw you're adding. If you are uncertain or unfamiliar with any of these concepts, we urge you to ask someone who has the knowledge to assist you.
Which Configuration do I use?
VIDEOS
Here are a couple of videos showing the product in action from both the front and rear views.
PRODUCT FITMENT
This product can be configured to fit just about any style of RV: Class A, Class B, Class C, Super C, Fifth Wheel and Travel Trailer. Assuming the information you provide about the RV is accurate (e.g. especially the MODEL NUMBER) the light kit you'll receive will provide the turn signal coverage you select for both sides of your RV. It is however impossible to provide a custom fit light kit without getting measurements of the specific RV in advance. For this reason you will likely need to trim some of the LED strips to fit your specific RV. We include instructions with each kit how to do this as well as the heat shrink necessary to properly seal any strips that need to be cut. Each light kit has it's own CUT SHEET included which details the layout for your specific RV.
Regardless of the light kit configuration, for most Turn Signal (and under-glow) installations we do here at BOOGEY HQ, we install Plastic (or Aluminum) L Channel or flat stock in some locations on the bottom of the RV. This is because the LED strip needs to be mounted on a flat, single contiguous mounting surface and in a straight line (the led strip cannot bend around corners or be bent on a horizontal plane). Also, the entire strip must be stuck to the mounting surface and not span across mounting surfaces. You'll notice we offer the option of purchasing Plastic L-Channel with this Turn Signal Add On light kit. You'll find a video on this product page that shows how we install this L Channel.
PRODUCT OPTIONS
Some are required. Some are optional. Refer to the following for details on each of the product options offered.
RV FORMAT: There are 11 possible RV format options presented. The 'format' relates to the type of RV you have along with the number of axles (total). EG: Motor home Class A 2 Axle, Fifth Wheel 3 Axle, etc. The number of axles your RV has is important for us to know so make sure you select the correct version as some RV formats have more than one version based on the total number of axles. In some cases, the format you choose will offer other options based the type of RV format you select. It's important to get this right because it, along with the overall length of the RV tells us important information about the type of light kit to ship. Do not guess at this. Make your selection from the drop down list. Note that we use some abbreviations in this list. For example. MH = Motor Home. The abbreviations should be obvious but if in doubt, ask us.
CONFIGURATION: The Configuration option refers to how much Turn Signal coverage you want on each side of your RV. The options presented vary based on your RV format. MH = Motor Home. FW = Fifth Wheel. TT = Travel Trailer.
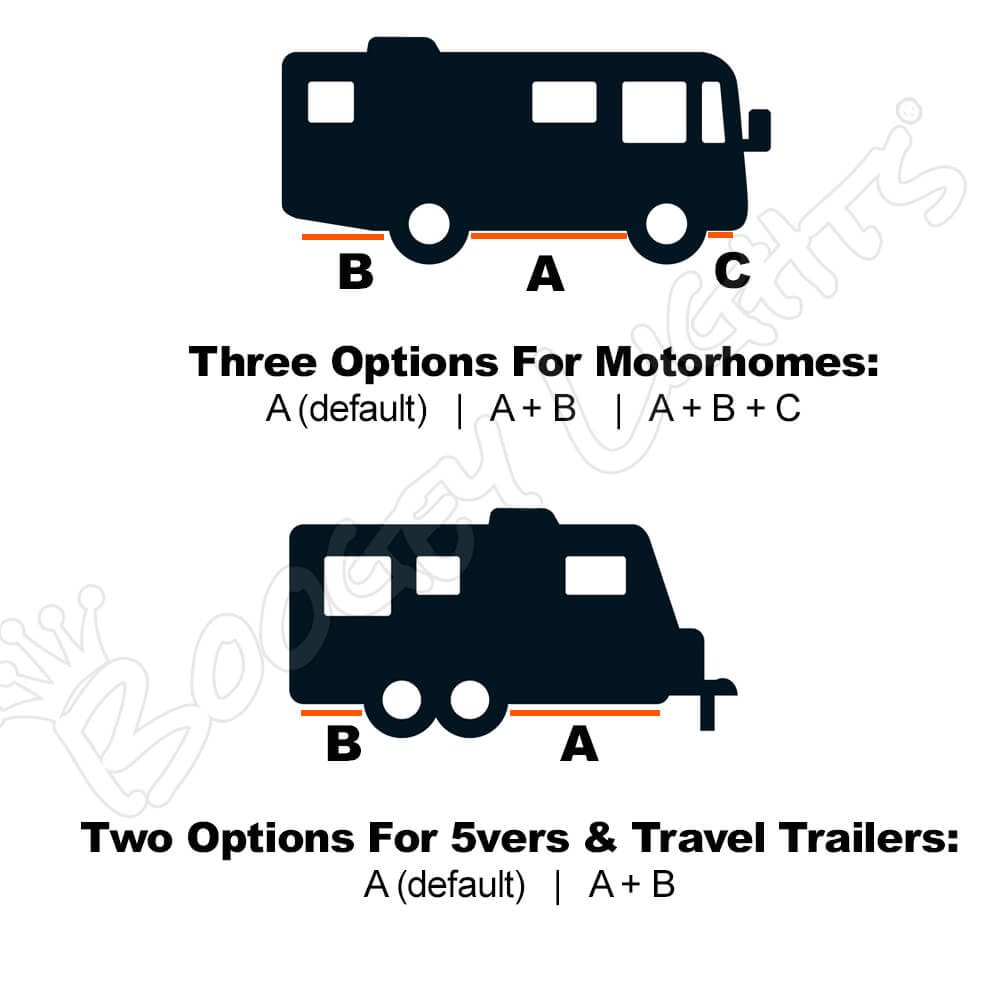
Here is an over-view of each:
- MH - Between Drive and Steer: Select this option if you want Turn Signal coverage between the drive and steer axles only. This is the default for all Motor Homes.
- MH - Between Drive and Steer + Behind Drive/Tag: Select this option if you want Turn Signal coverage between the drive and steer axles PLUS behind the drive/tag axles.
- MH - Between Drive and Steer + Behind Drive/Tag + In Front of Steer: Select this option if you want Turn Signal coverage between the drive and steer axles PLUS behind the drive/tag axles AND in front of steer. This is full coverage. The entire length of motorhome.
- FW - In Front of Axles: Select this option for Turn Signal coverage in front of the axles on your fifth wheel trailer. This is the default for all Fifth Wheel trailers.
- FW - In Front of Axles + Behind Axles: Select this option for Turn Signal coverage in front of AND behind the axles on your fifth wheel trailer. Full coverage on each side.
- TT - In Front of Axles: Select this option for Turn Signal coverage in front of the axles on your travel trailer. This is the default for all travel trailers.
- TT - In Front of Axles + Behind Axles: Select this option for Turn Signal coverage in front of AND behind the axles on your travel trailer. Full coverage on each side.
RV LENGTH: Select the length of your RV from the available drop down list. This measurement is in feet. Use the real, actual overall length. Some model numbers will have an approximate length embedded in the model number. We need the actual overall length. If your RV length is not in even feet, round down (e.g. 29.5' use 29').
RV MANUFACTURER: Select your RV MANUFACTURER's name from the drop down list. If your RV manufacturer is not listed, select OTHER at the bottom of the list.
RV MODEL NAME: Type in the MODEL NAME of your RV. This is different from the manufacturer name or the model number.
RV MODEL NUMBER: Type in your RVs MODEL NUMBER. This is the most important piece of information. Do not guess at it or skip it. We cannot build your kit without it. It tells us the real overall length, tire sizes and wheelbase in inches (not feet). It also provides us with details on the floor plan layout of your RV which might impact the mounting locations. RV manufacturers assign a model number to each model they produce. The model number is different from the model name. The model numbers can be all numbers or a mix of numbers and letters. Some examples: 3412, LXE44B, 37K, KSDP3910, 29XPS, 4014LEV, 36TK3, LX455, MD2, 4369.
NOTE: If you do not know the model number or can't provide one that is sufficient for us to obtain the information needed to build the under-glow kit, we will reach out to you asking for the following data: real overall length (inches), wheelbase (inches) and tire sizes. In some instances, we may ask for the VIN too.
RV YEAR: Select the year of your RV.
ADD PLASTIC L-CHANNEL: This product selection is optional. Some installations can benefit from it. We have a video further down on this page showing how we do the install using this plastic L-Channel. We suggest viewing the video and then examining the bottom of your RV to see how it might work for you (or not).
ADD PRE-BUILT LED CONTROL CENTER: This product selection is optional but we suggest ordering it unless you're familiar with how relays are wired. These LED Control Centers make for a professional looking installation. Also makes the installation a little easier for DIYers since the relay wiring is neatly organized and easily identifiable. It's also a time saver.
PLASTIC L-CHANNEL OPTION
We offer the option of adding Plastic L-Channel to your order. We prefer plastic vs aluminum because it's easier to work with however aluminum angle will work too. The amount will depend your RV configuration and the Turn Signal Coverage you select. In the below video we show you how we typically mount Boogey Lights® LED lights to the bottom of an RV or trailer. Essentially any vehicle that has a continuous mounting surface. Works well for all RVs, cargo trailers, food trucks, food trailers, cargo vans, pickup trucks and cars. This in instance, we installed both our UNDER-GLOW (RGB) light system AND our Turn Signal Add On lights (Amber). You'll see how we used the Plastic L-Channel to do it. The Plastic L-Channel is 2" x .5" x .125" thick. Rivets are 1/8" x 1/4" (4-4) or 1/8" x 5/16" (4-5) depending on the material we're mounting the L Channel to. Rivets are large flange rivets. We also use 1/4" and 3/8" split loom to wrap the power lead wire. Note too we include a close up photo diagram of the L channel assembly below the video. Scroll down to see it.

PRE-BUILT LED CONTROL CENTER
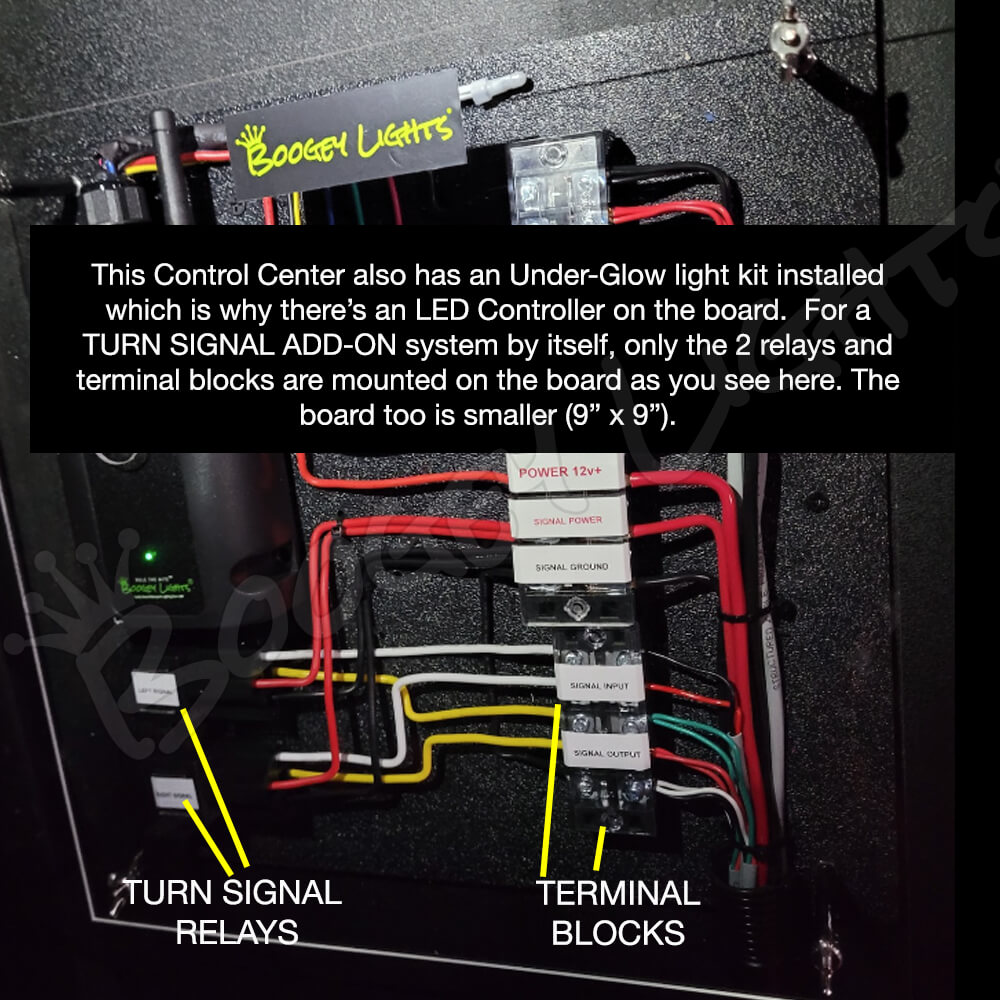
We offer the option of pre-building the Control Center with your order. These LED Control Centers make for a professional looking installation. Also makes the installation a little easier for DIYers since the RELAY wiring is neatly organized and easily identifiable. It's also a time saver. Can easily save two hours when doing a typical installation. The pre-built Control Center has the relays and power connections mounted to a PVC board. The power connections make it simple to connect your battery power as well as the LED strip power leads via a terminal blocks mounted to the board. Simply strip the end of the battery lead cable and LED strip power leads, push them into the terminal block and tighten the screw. This design also makes trouble shooting easier. The board has four 2" stand offs with plexi-glass mounted on top which keeps the components protected.
LED SPECS
This light kit is based on our popular DOT compliant single color AMBER LOW PROFILE LED strips. Details about these LED strips can be found by clicking on button below as well as the SPECS navigation tab appearing on this product page.
UNDER-GLOW LIGHT KIT OPTION?
If you're looking to add under-glow lighting to your RV (in addition to this add-on turn signal kit), we offer this Easy Order RV Under-Glow LED light kit that can fit just about any RV. It can be installed at the same time the turn signal kit is installed. In fact, the RV shown on this product page has both our Under-Glow light kit and our Turn Signal Add-On light kits installed together (photo below showing the installation of both LED strips on the same L Channel Mounting plastic). The under-glow kit however has to be ordered separately. Details are on that product page link.

OTHER ITEMS YOU MAY NEED
No two installation scenarios are the same. Not everyone shares the same installation quality goals. Some folks are OK with twisting wires together, others want to solder them. Some folks are OK with running wires where they may be seen or unprotected to save money/time, others want a tidy, clean install without any wires showing. Some folks are OK with mounting their LED strips to whatever surface they can find, others want to take the time necessary to build out appropriate mounting surfaces to provide the best lighting effect on their vehicle. The point is it's not possible to provide all the materials necessary for all installation scenarios and quality goals. Our light kits provide the essential components needed for a high-quality, functioning lighting system. Installation of our light kit to your specific vehicle may however require additional items to make it look and fit the way you want. This is particularly the case with electrical wiring and mounting of LED strips. Before proceeding with your installation we suggest you consider THESE OTHER ITEMS.
WHY BOOGEY LIGHTS®?
Unlike most every other light kit out there, these light kits are ACCENT LIGHT KITS. When mounted properly, you'll never see the LED lights themselves. You'll only see the glow from the LEDs. If you're interested in learning more about WHY Boogey Lights are different than any other LED lighting system on the market, click here: WHY BOOGEY LIGHTS . We do a deep dive into the ten differences between Boogey Lights® and all the others.
Installation Information & Tips
IMPORTANT. You must have an understanding of 12vdc power. An essential skill with installation of any Boogey Lights LED products is knowing how to correctly wire the product to a 12vdc circuit. This includes understanding the importance of having a properly sized fuse at the power source, polarity, how to properly seal an electrical connection, using properly sized wire gauge for the load, measuring voltage and measuring the additional amperage draw you're adding. Also, for this light kit you need to know how to locate and tap into your vehicle's left and right turning indicator circuits to trigger the relays. If you are uncertain or unfamiliar with any of these concepts, we urge you to ask someone who has the knowledge to assist you. Electricity is unforgiving.
INSTALL DOCUMENTATION
All of our installation documentation for this product (and all others) is available to download directly from our website: DOWNLOAD THE TURN SIGNAL ADD ON light kit installation documentation. We encourage you to download this information and review before placing your order. That way you'll have a solid understanding of what is required (and no surprises). Here are some of the most important installation documents for this product. You will find ALL available documentation in our INSTALLATION RESOURCES SECTION.
You may also want to check out our section of HOW-TO VIDEOS which many customers find helpful with deciding how they want to install their Under-Glow lights.
LAYOUT & WIRING PLAN
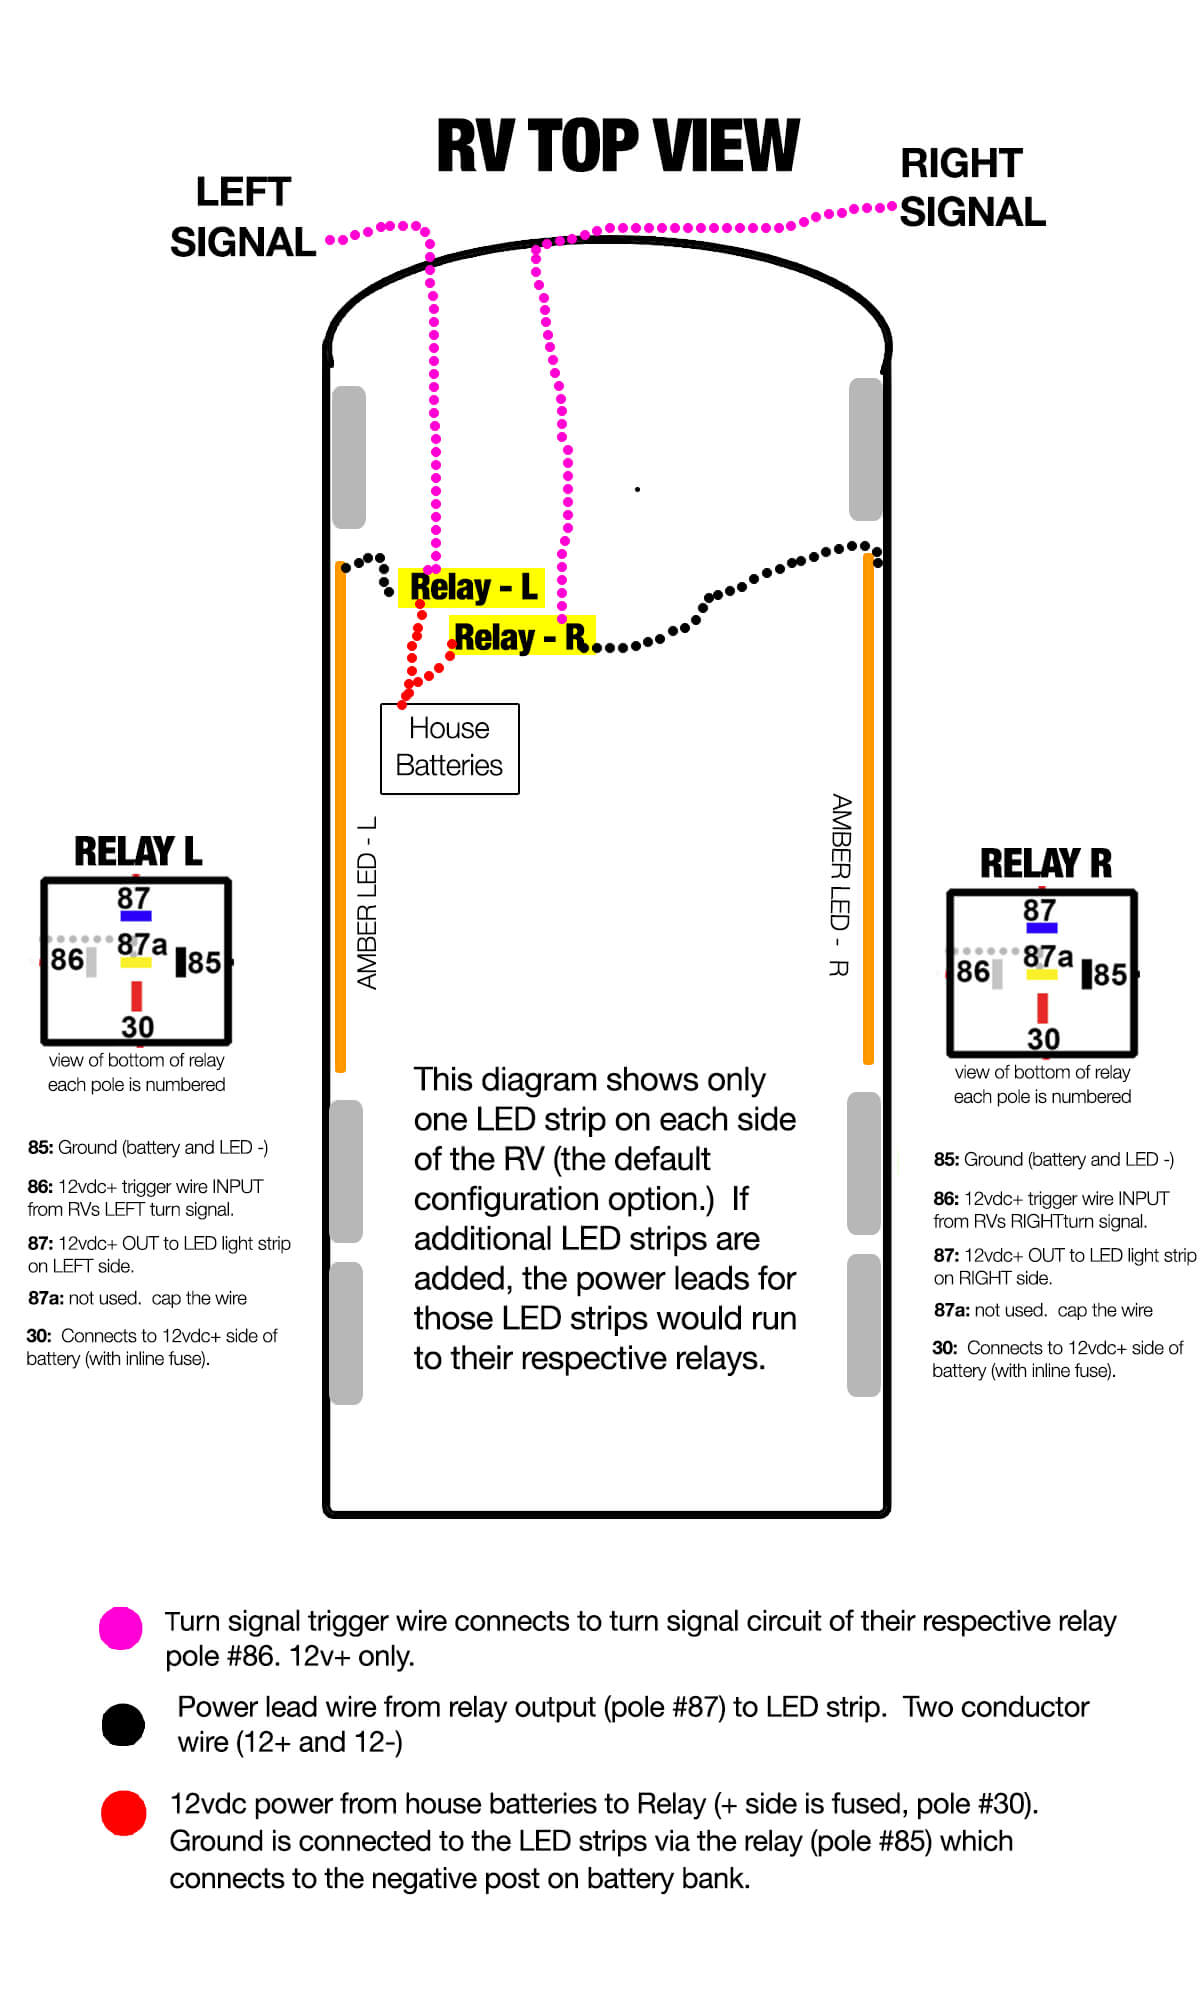
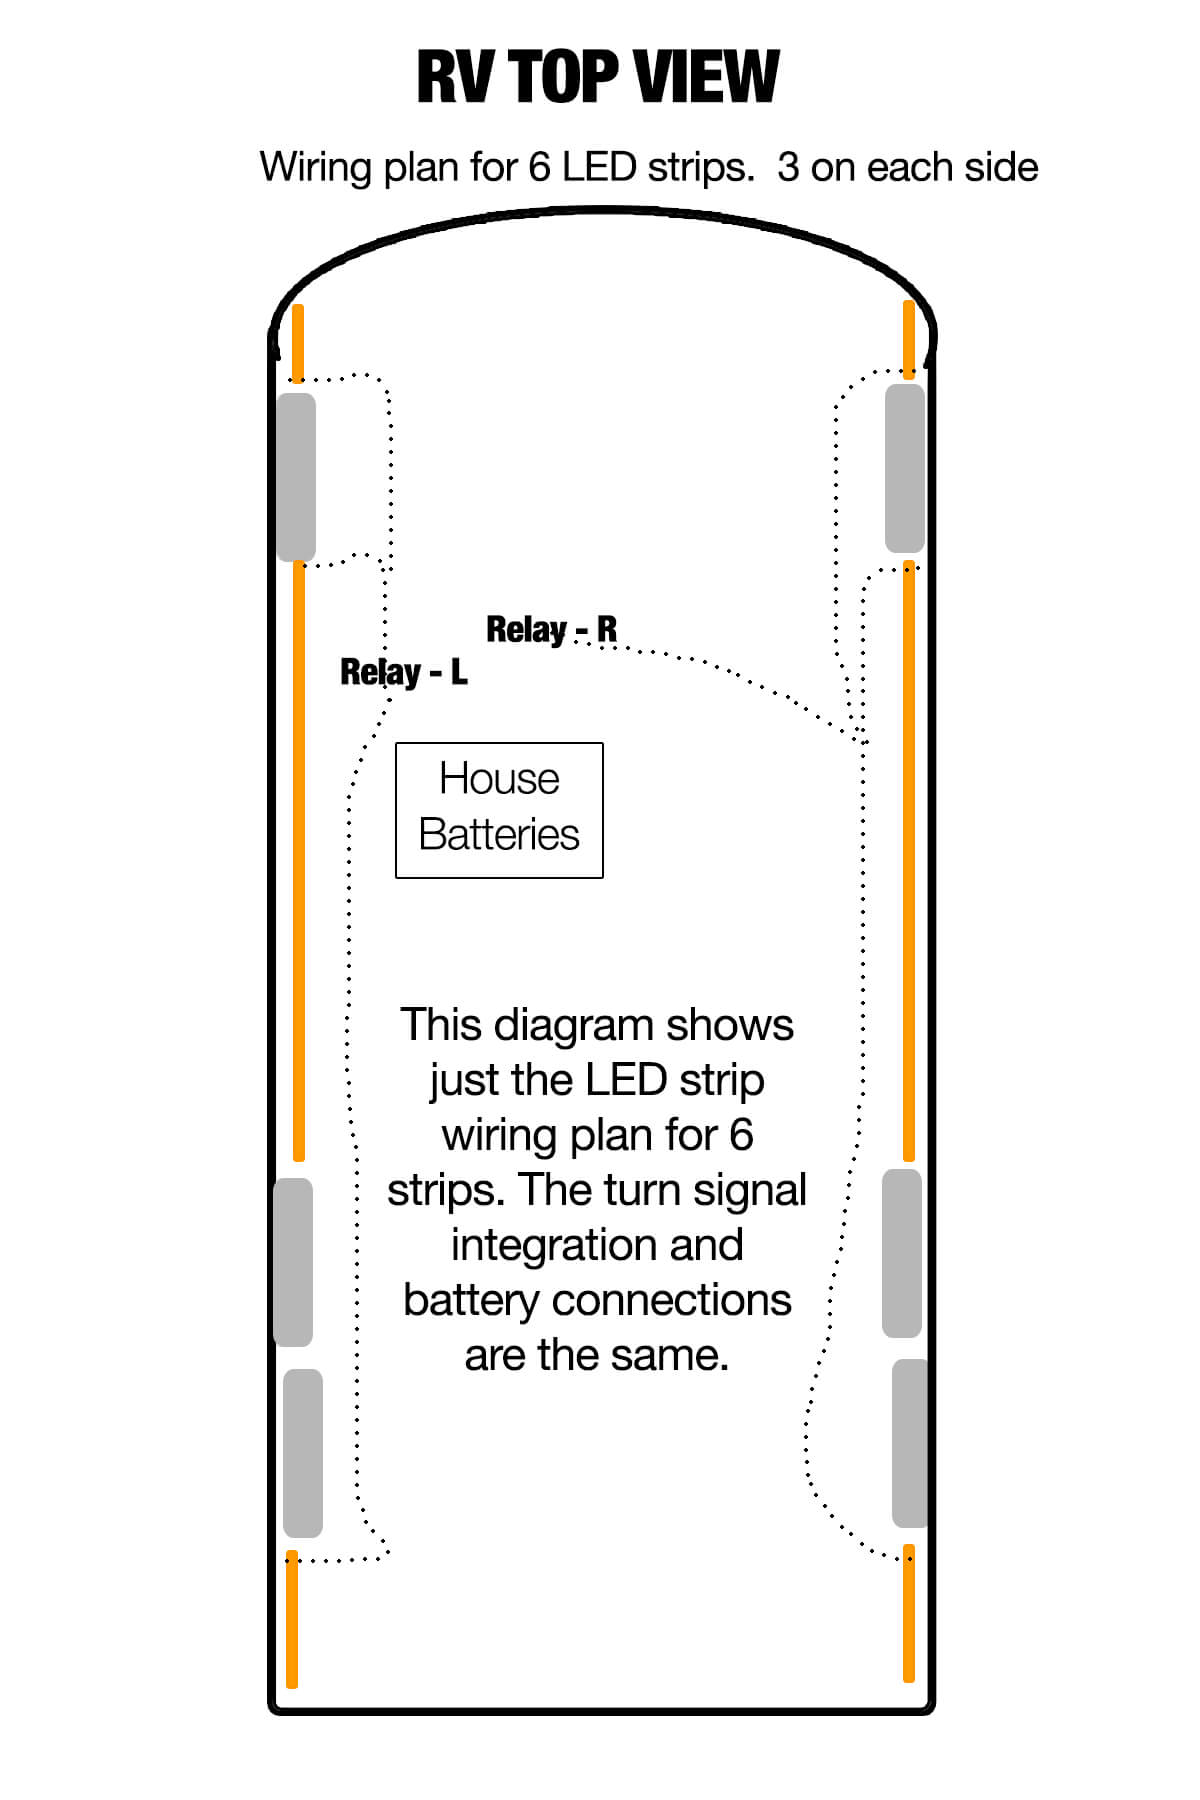
Suggested layout and wiring diagrams are below. Note that this product requires two heavy duty relays wired in with your RVs turning indicators. Both relays are supplied with the kit. You'll find the wiring information for these relays below as well as in our written installation documentation for this light kit. If you do not understand how relays work and/or the wiring instructions for these relays, we strongly urge you to get assistance from someone locally who can be onsite with you to do the installation. We are not able to provide remote support for the relay integration of this light kit with your specific RV.
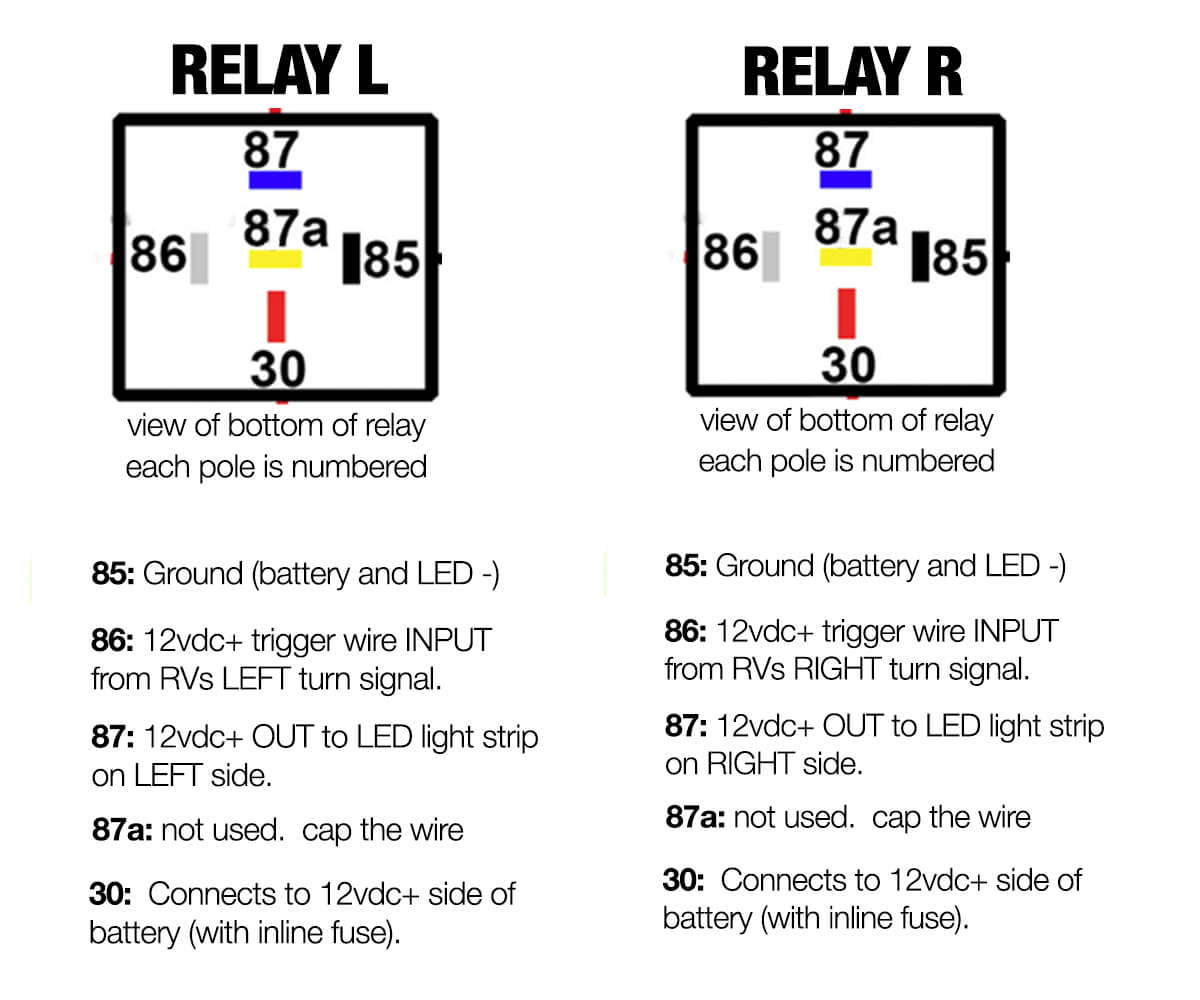

CONSIDERATIONS
IMPORTANT! To make the LED strips flash when the turn signals flash you'll need to be able to tap into both the LEFT and RIGHT turn signal circuits on your RV. THESE WILL BE 12VDC + CIRCUITS. For motorhomes, we prefer to do this at the front of the RV where at least in our experience, both signals are relatively easy to tap into. In most cases you'll need to get behind the signal cluster on the front of the RV to access the wires that connect to the turn signals. Some vehicles are easier than others. It will be different for every vehicle. Be aware that the wiring harness that connects to the turn signal on each side may or may not also include wires that connect to the head lights, daytime running lights and/or marker lights as well. You only want to connect to the turn signals. Fifth wheel and travel trailer's you can usually pull the turn signal wires directly from the 5 way plug coming from the tow vehicle OR turn signal marker lights on both sides of the RV. Regardless of the RV format, it's important to carefully examine the wires before cutting into them. We always use a multi-meter to do this testing to make sure we're tapping into the correct circuit. It may take some trial and error to do this. If you're not sure how to do this safely, we strongly suggest asking someone who is to assist you. This isn't something we can assist you with as there are no standards from one RV to the next.


