


LED Light Kit for Pontoon Boats
Light up your pontoon boat with a Boogey Lights® LED light kit! Designed specifically for outdoor use this LED light kit is incredibly bright. Our low profile hi-intensity LED strips are perfect for mounting just about anywhere in a boat that isn't submerged. They produce a smooth, even glow of light to give your boat that custom look. Our LED light kits provide both functional lighting as well as decorative, accent LED lighting. While most people will mount this light kit under the deck (shining downward -- see install tab for an example), it doesn't have to be that way. Some will install this kit on the side of the boat shining outward. Others will install it on the deck facing upward. All depends on what you want to do. This kit will accommodate pontoon boats in the 25 to 30 feet range (depending on how it's mounted).
PRODUCT HIGHLIGHTS
Available in eight different single colors and three multi-color configurations. The base Pontoon Boat LED light kit consists of two, 16' LED strips each with a 15' power lead on your choice of Black or White PCB. A 16' LED strip will work for most pontoon boats up to 22' (assumes you're lighting under the deck). If you want to go longer, the kit can be configured with additional LED strips that will provide up to 24' in LED light strip length which works well for boats up to 30' long. Be sure to click on the INSTALL information tab of this product page to see how these LED strips are typically mounted. You can control the lighting with the included RF hand-held wireless remote or use your bluetooth enabled smartphone and our free IOS or Android APP. Powered by 12vdc. IP65 rated. Not intended for use under-water. If mounting in an area where lights will be exposed to salt water - or you want a more professional, polished installed look - we recommend mounting in a protective channel such as our Mini T-12 aluminum channels and difusers (sold separately). The INSTALL tab on this product page shows an installation using these aluminum channels for under the deck of a pontoon boat.
AVAILABLE OPTIONS
LED Color: Select the LED color you want from the drop down box. There are eight possible single color options (Red, Green, Blue, White, Orange, Amber, Pink, Magenta) and three multi-color options (RGB, RGBW, RGBA). Selecting the LED color option will adjust the available options you can select based on your color selection. See CONFIG tab for more detail on the multi-color options.
Controller Configuration: Select the type of LED strip and switch/controller combination you want from the drop down. Note that our controller options all offer our new GEN2 (G2) LED controller. See CONFIG tab for more details on these options.
Kit Configuration: Select the LED strip lengths from the drop down. See CONFIG tab for more details on these options.
PCB Color: Select BLACK or WHITE PCB. Details on why this might be important to you are below. Note: RGBW, RGBA and RGBWW are only available in Black PCB.
Optional - Add Extra 3M Adhesion Primer: All of our lighting kits come with 3M adhesion primer sufficient to do the installation. Some folks however prefer to order extra; just in case.
LENGTH CONSIDERATIONS
The maximum length of a single LED strip is 16'. The laws of electricity won't allow it to go longer with today's LED 12vdc technology without sacrificing brightness and durability. If you want to go longer than 16' (e.g. 20'), you have two options. One is to simply center the 16' LED strip in that 20' space. Boogey Lights are already very bright so for most folks, having enough light is never a concern. That said, some prefer to have full coverage of the entire 20' area. In that case it's possible to cover that entire 20' span using two LED strips. You'll notice this kit can be configured with 4 - 10' LED strips (2 on each side of the boat) OR 4 - 12' LED strips (2 on each side of the boat). If using 2 LED strips on each side, the LED strips are typically mounted end to end to provide the illusion of one single LED strip. Be sure to click on the INSTALL tab of this product page to see how these LED strips are typically installed.
SINGLE ZONE OR DUAL ZONE?
This kit offers both SINGLE ZONE and DUAL ZONE controller options. As the names suggest, a Single Zone controller has just one single lighting zone. All LEDs wired to the controller are on one zone. Whatever color or feature set you apply will be what you get on all leds. Pretty simple. With our Dual Zone controller, you can set up and operate two distinct lighting zones which can be operated and controlled individually or together. With the Duty Dual Zone LED Controller you have more flexibility as to how you want to control your Boogey Lights. On a Dual Zone controller each lighting zone is capable of supporting up to 1500 LEDs for a total of 3000 LEDs. It will work with your Android® or iOS® Smartphone. It will also work with the included M7 Style RF wireless remote. Details on features are below.
LED CONTROLLER FEATURES
Bluetooth + RF Combo Wireless Control
The LED Controllers offered in this kit are our GEN2 Single Zone and Dual Zone Heavy Duty Bluetooth COMBO LED Controllers. COMBO means they can be operated using either the included M7 RF wireless hand held remote OR your Bluetooth enable smartphone (and our free APP). Both will work. The RGB version is capable of displaying 16 million different color combinations. The GEN2 RGBx version can display even more color combinations depending on the type of LED strips connected to them. In addition, lighting effects on the Bluetooth controller are significantly more controllable in terms of speed and intensity. Each color and lighting effect is controlled by "sliders" or a color square on your smartphone screen so you can adjust the speed and intensity to get the lighting the way you want it.
Key Features & Capabilities
- Our GEN2 LED Controllers are based on the Bluetooth 5 chip set family which provide fast response times and the best possible RF/Bluetooth transmission distance.
- The SUPER and HEAVY DUTY GEN2 Controller can support Single Color, RGB, RGBx and RGBxx LED strips with both RF and Bluetooth control.
- The HEAVY DUTY controller versions include two antennas: a screw-on 2" stubby antenna and an extended magnetic mount antenna with 15' of wire for optimal reception on any vehicle.
- Use the included RF wireless remote to quickly turn on/off/dim your Boogey Lights. You can also select up to 7 different preset colors using the RF remote as well as access 7 different lighting features.
- Use your smartphone to operate your Boogey Lights®: On, Off, Dimming, Color Selection, Brightness, Speed, Color Programming, Timers
- Adjust the color sliders or color square to select the color you want.
- Access additional lighting features (e.g. strobing, flashing, breathing, morphing) modes using the 7 Function Keys.
- Save your favorite lighting configuration using Pre-Sets
- Countdown Timer and a 24 hour On/Off Timer function
- Quick-Switch feature for use with RGBx LED strips.
- Password protection to stop others from connecting to your LED controller.
- Programmable Color Rotation mode offers the ability to program the controller to display two or three colors of your choice and then rotate those colors in sequence.
- Assign a 'nick name' to your controller so you can easily find it when scanning.
- Set the APP to auto-connect to your LED controller every time you launch the APP on your phone
- DOWNLOAD the GEN2 LED Controller Operating Manual & Wiring Diagrams
- DOWNLOAD the GEN2 Bluetooth Operating Manual
- DOWNLOAD the GEN2 M7 RF Wireless Remote Operating Information
- VIEW the GEN2 LED Controller Series Product Page
- VIEW the GEN2 BLUETOOTH APP Information Page
COLOR OPTIONS AND CONSIDERATIONS
This light kit is offered in eight single color options and in three multi-color configurations: RGB, RGBW (RGB + warm white) and RGBA (RGB + amber). For the single color options the LED controller wireless RF remote will give you the ability to turn the LEDs on/off as well as dim, flash, strobe and breath (and change the speed at which those features work). With the bluetooth APP, you can perform these same functions as well as save presets. For the multi-color options, you have the same capabilities however the feature set is significantly expanded since you also have the ability to change/adjust/tweak the colors you want to display. With the included RF wireless remote you can change between 7 pre-set colors (Red, Green, Blue, White, Light Blue, Lime Green/Yellow, Hot Pink/Purple) and functions of on/off, blending, strobing, breathing, flashing, fading and dimming. You can also use your Bluetooth enabled smart phone to create a custom look. The Bluetooth APP allows you to program the RGB diodes of any of our RGB, RGBW and RGBA strips with over 16 million different color combinations plus three pre-sets. Also, the Bluetooth APP offers 2 and 3 color rotation programming along with two timer features. Click the BLUETOOTH APP navigation tab on this product page for significantly more information on both the Bluetooth capabilities and APP functionality (including a video showing how the Bluetooth APP works)
RGBW: On the RGBW led strip, in addition to RGB, you get one extra diode which is Warm White. That warm white diode has a Kelvin temperature of 2400 which means it has a yellowish look giving it a warmer, softer, candle like look (see photo below). That fourth diode on the RGBW led strip can be wired directly to our GEN2 LED Controller which supports RGBx LEDs. As an option, you could also wire that fourth diode to a completely separate on/off switch. Your choice. You could also use the Quick-Switch feature with this fourth diode too.
RGBA: On the RGBA led strip, in addition to RGB, you get one extra diode which is AMBER. That fourth diode on the RGBA led strip can be wired directly to our GEN2 LED Controller which supports RGBx LEDs. As an option, you could also wire that fourth diode to a completely separate on/off switch. Your choice. You could also use the Quick-Switch feature with this fourth diode too.
Using the Quick-Switch Feature. The Quick Switch feature is available on our GEN2 SUPER, HD SINGLE ZONE and HD DUAL ZONE LED Controllers. Whatever color LED you have connected to the GREY output wire of the GEN2 Controller is the color that will display when the Quick Switch is triggered with 12vdc +. The most common use for this configuration is with commercial vehicles who want to be able to instantly turn off whatever color they're running and turn on a DOT compliant AMBER which is on our RGBA LED strips but it could be used for other applications too. For these installations, the yellow trigger wire is connected to a toggle switch or other wireless switch that activates the AMBER leds. You can also do the same thing with the RGBW product. When the Quick Switch trigger wire is not energized, the LED controller operates the RGBxx diodes normally.

INSTALLATION NOTES
The LED strips in this kit are designed to mount under the decking just above each pontoon (see photo below). It provides a nice glow on the pontoons and water.
You need a smooth flat surface to mount the LED strip to. We suggest mounting some flat plastic or aluminum bar to the decking and then mounting the LED strip to that flat plastic/aluminum bar. Important that you use rivets though instead of screws because rivets are flat. If you mount the LED strip on top of the screw heads, those screw heads will eventually tear up the LED strip backing and cause the LED strip to fail prematurely (not covered under warranty).
Be mindful of the amperage draw of your lighting system. For pontoon boats we recommend having two batteries. Click on the SPECS tab of this product page to see amperage data for all of our lighting systems.
The photos below are of an installation on a 22' Godfrey Aquapatio pontoon boat. We used two 10' LED strips on each of the boat that gives the illusion of a single 20' LED strip on each side. The two strips butt together in the middle. This particular installation includes our DUAL ZONE LED CONTROLLER. ZONE 1 was wired to the pontoon lights and ZONE 2 was wired to interior lights we added (custom cut to order).


USING 3M ADHESION PRIMER
To achieve the full adhesive strength of the 3M® tape affixed to the back of each strip 3M® Adhesion Promoter (aka Primer) must be applied to the mounting surface first. This is an important step to ensure a secure bond. The 3M® Adhesion Promoter creates a chemical bond between the tape and the mounting surface such that the LED strip will stay stuck (at least until you decide you want to remove it). Using any other solvent such as rubbing alcohol or acetone is not the same thing as using 3M® Adhesion Promoter. While these solvents will help clean the surface, they do not prime the surface. There is a difference. 3M® Adhesion Promoter is included with this kit although you may elect to purchase more if you'd like.
NOTE: Warranty is void if used under-water or in salt-water environments.
OTHER ITEMS YOU MAY NEED
No two installation scenarios are the same. Not everyone shares the same installation quality goals. Some folks are OK with twisting wires together, others want to solder them. Some folks are OK with running wires where they may be seen or unprotected to save money/time, others want a tidy, clean install without any wires showing. Some folks are OK with mounting their LED strips to whatever surface they can find, others want to take the time necessary to build out appropriate mounting surfaces to provide the best lighting effect on their vehicle. The point is it's not possible to provide all the materials necessary for all installation scenarios and quality goals. Our light kits provide the essential components needed for a high-quality, functioning lighting system. Installation of our light kit to your specific vehicle may however require additional items to make it look and fit the way you want. This is particularly the case with electrical wiring and mounting of LED strips. Before proceeding with your installation we suggest you consider THESE OTHER ITEMS.
Will Boogey Lights® Work with Other Brands?
The short answer is probably not. All Boogey Lights® RGB LED strips are COMMON CATHODE LEDS. They share a common ground and will only work with positively switched controllers. Most LED strips on the market today are COMMON ANODE because the controller technology used to power them is less expensive to manufacture. However they're not nearly as bright and are an overall inferior design when compared with COMMON CATHODE LEDs. For more information, click the button below.
WHY BOOGEY LIGHTS®?
Unlike most every other light kit out there, these light kits are ACCENT LIGHT KITS. When mounted properly, you'll never see the LED lights themselves. You'll only see the glow from the LEDs. If you're interested in learning more about WHY Boogey Lights are different than any other LED lighting system on the market, click here: WHY BOOGEY LIGHTS . We do a deep dive into the ten differences between Boogey Lights® and all the others.
Product Configuration Options
This product offers our new GEN2 family of LED Wireless Controllers. It's called the GEN2 or simply the G2 LED controller. These new G2 LED controllers have the same capabilities as our GEN1 LED controllers along with some new features, capabilities and design improvements. You can read more about these new features on our GEN2 COMBO LED CONTROLLER product page. You'll see these new G2 LED Controller being offered in the CONTROLLER CONFIGURATION drop down of this product page. The GEN2 controller can power single color, RGB, RGBx and RGBxx LEDs.
LED Color Options
This LED light kit is offered in eight single color options and in the following multi-color configurations: RGB, RGBW (RGB + warm white) and RGBA (RGB + amber). Single color simply means the LED strip is one color all the time. The color cannot be changed. The color you choose is the color you get. Multi-color means you can change or select different colors. All of the multi-color RGB options require an LED controller to operate. The advantage of RGB over a single color LED strip is that RGB gives you the ability to change colors as well as access other features such as dimming, flashing, breathing and color blending. With the bluetooth interface, you can save favorite color/feature sets as well as program 2 or 3 color rotation sequences. More detail about these advanced features can be found on the product page. With RGB you can choose between 7 (using the hand held wireless remote) and 16 million (using the bluetooth APP) different color combinations. RGBW includes all of the RGB colors and capabilities plus the addition of a warm white diode (2400 kelvin temp). Warm white is often referred to as a 'candle white' or 'soft white'. RGBA includes all of the RGB colors and capabilities plus the addition of an amber diode. Amber attracts fewer bugs than white. It's also not nearly as bright; easier on the eye at night which some folks prefer. We have included a photo of these different color temperatures of white on the main product page. Make your selection from the LED COLOR OPTION drop down.
Controller Configuration Options
The LED Controller Configuration Options offers the following SINGLE COLOR and MULTI-COLOR controller options as follows:
Single Color: No switches or controller. Select this option if you want a single color led strip (e.g. can't change colors -- just one color that you select from the LED Color option drop down) and you already have a means by which to switch the light on/off. Just be aware of the amperage draw. As a point of reference, single strip of 300 white leds will draw about 3.3amps on full brightness. All other colors will draw less.
Single Color: Single Zone. Select this option if you are ordering a single color led strip (e.g. can't change colors -- just one color that you select from the LED Color option drop down). This controller will power up to 1800 LEDs (max of 20 amps) all on one single zone. This controller is both RF wireless + Bluetooth capable. The RF wireless M7 style remote is the most popular because of it's large, easy-to-use and see buttons. With either the included RF wireless hand-held remote or Bluetooth APP you have the following features with single color LEDs: on/off, dimming, fading, breathing and strobing. With the Bluetooth APP you can also save presets. This controller is 5.5" long x 3.25" wide and 1.5" high. Note that the overall length to accommodate room for wires is 7.5".
Single Color: Dual Zone. This controller offers the same functions and features as the single color single zone controller mentioned option above but it's a DUAL ZONE LED Controller. There are two distinct lighting zones. This controller will power up to 3000 LEDs with a max capacity of 1500 LEDs per zone (20 amps max per zone). This controller is 5.5" long x 3.25" wide and 1.5" high. Note that the overall length to accommodate room for wires is about 10".
Multi-Color: Single Zone. Will work any of the multi-color LED strips offered (e.g. RGB, RGBA or RGBW). This controller will power up to 1800 LEDs (20 amps) all on one single zone. This is a COMBO LED Controller in that it includes both an M7 style RF wireless hand-held remote and Bluetooth integration. This LED controller can be used with any of our RGB LED strips including the RGB, RGBW and RGBA. With the included RF wireless hand-held remote you can change between 7 colors (Red, Green, Blue, White, Light Blue, Boogey Lights Green (lime green/yellow), Hot Pink/Purple) and functions of on/off, blending, strobing, breathing, flashing, fading and dimming. You can also use your Bluetooth enabled smart phone to create that custom look with over 16 million different color combinations plus three pre-sets and color rotation programming functionality. See additional details and it's capabilities on the APP navigation tab appearing on this product page. With both an RF wireless remote AND bluetooth integration, you get the best of both worlds. This controller is 5.5" long x 3.25" wide and 1.5" high. Note that the overall length to accommodate room for wires is 7.5".
Multi-Color: Dual Zone. This controller offers the same functions and features as the multi-color single zone controller mentioned above but it's a DUAL ZONE LED Controller. There are two distinct lighting zones. This controller will power up to 3000 LEDs with a max capacity of 1500 LEDs per zone (20 amps max per zone). This controller is 5.5" long x 3.25" wide and 1.5" high. Note that the overall length to accommodate room for wires is about 10".
Kit Configuration Length Options
The default length of a single LED strip is 16', which contains 300 super-bright tri-chip LEDs. You can cut the LED strip every 3 LEDs if you need to. If you need to cover a larger area than the default of 16', the KIT CONFIGURATION drop down box offers these lengths: 16' (default), 20' or 24'. The kit includes two - 16' strips so if you order the longer configuration (e.g. 20'), you'll receive four - 10' LED strips. Regardless of the kit configuration, each led strip includes a 15' power lead hard wired to one end of the LED strip. There are no connectors. Single color LED strips have 2 conductor power lead. RGB has 4 conductor power leads. RGBW and RGBA both have 5 conductor power lead leads. Single Color and RGB led strips are 3/8" wide (10mm). RGBW and RGBA are 1/2" wide (12mm). All are 1/8" high/thick. The maximum length of a single LED strip is 16'. They cannot be daisy chained together. The laws of electricity won't allow it to go longer with today's commericially available technology using 12vdc power and super bright 5050 led chips. If you have an application that requires longer than 16' (e.g. 20'), you have two options. One is to simply center the 16' LED strip in that 20' space. Boogey Lights are already very bright so for most folks, having enough light is never a concern. This is what most people do. That said, some prefer to have full coverage of the entire 20' area. In that case it's possible to cover that entire 20' span using two LED strips. In the case of a 20' span you can order two - 10' LED strips using the KIT CONFIGURATION drop down selection above. You'll notice we offer the option of 2 - 10' LED strips (20' total coverage) as well as 2 - 12' LED strips (24' total coverage). Regardless of how you break up the 20' span, the two LED strips (totalling 20') are installed such that the two LED strips butt together; end to end, which gives the illusion of a single 20' long LED strip. If ordering multiple strips from the Kit Configuration drop down (2 - 10' or 2- 12' LED strips), one of the LED strips will have a longer power lead on it to allow for the power lead to double back over. You may also need to purchase additional power lead wire. If you need to order additional LED strips, you can do so using our ADD-ON LED STRIPS.
Extra 3M Adhesion Primer
3M Promoter is a powerful adhesion primer. It's an essential step in the installation process but you don't need much of it to make it work. A simple single swipe on the surface you're mounting the light strip to is all you need. Our lighting kits include enough 3M Adhesion Primer to mount the strips in the kit for most installations. Some customers however feel better if they "paint" the mounting surface completely with it -- which is fine if you want to but not necessary. The problem is that 3M Adhesion Primer isn't readily available everywhere; particularly weekends, holidays and evenings. If you use all of the primer that's included with the kit but run out before you're finished, you'll have to wait to finish the job until you get more adhesion primer. If you're one of those people who would prefer to have a little adhesion primer left-over just in case, we offer the option of adding an additional bottle to your order.
Installation Information
You can download installation documentation directly from our website at any time. The INSTALL DOCS button above will show you all available documentation - including the marine installation guide, wiring diagrams, operating information and how-tos. Our product documentation is quite extensive. We encourage customers to take the time to review the documentation before making their purchase decision.
IMPORTANT. You must have an understanding of 12vdc power. An essential skill with installation of any Boogey Lights LED products is knowing how to correctly wire the product to a 12vdc circuit. This includes understanding the importance of having a properly sized fuse at the power source, polarity, how to properly seal an electrical connection, using properly sized wire gauge for the load, measuring voltage and measuring the additional amperage draw you're adding. If you are uncertain or unfamiliar with any of these concepts, we urge you to ask someone who has the knowledge to assist you. Electricity is unforgiving.
Be sure to SCROLL DOWN on this product page and expand each of the text groups below.
Suggested Placements
- Install this LED light kit under the deck just above each pontoon (see installation photos below). It provides a nice glow on the pontoons and water. If you need to cut the strip to fit you can. Just make sure you cut where marked.
- You need a smooth flat surface to mount the LED strip to. We suggest mounting some flat plastic or aluminum bar to the decking and then mounting the LED strip to that flat plastic/aluminum bar. Important that you use rivets though instead of screws because rivets are flat. If you mount the LED strip on top of the screw heads, those screw heads will eventually tear up the LED strip backing and cause the LED strip to fail prematurely (not covered under warranty).
- Optional - Add additional 2', 4', 8' or 16' strips as needed across the bow, stern, under the bimini or in the cockpit to accent other areas of the boat.
- Optional - Add HEAVY DUTY LED STRIPS (IP67 rated) to areas that are submerged for brief periods of time or might be subject to direct impact.
Installation Photos
Preparing the Mounting Surface
Since 1989 we have installed our hi-performance accent lights on just about every possible type of motorsports vehicle known to man – motorcycles, cars, trucks, boats, RVs, bicycles, scooters, trailers, ATVs, airplanes, trains and golf-carts. The one thing all these applications have in common is they often operate in harsh environments where they are exposed to heat, vibration, cold, dust, dirt, wind and water. Experience has taught us the importance of properly preparing the mounting surface which includes using 3M® adhesion promoter. Most LED light kits we sell includes 3M® promoter (aka "primer"). It's essential the surface be prepared using this 3M® promoter and that you follow the directions provided. We strongly urge you to read these instructions and follow them completely. Do not cut corners. If you purchased an LED light strip that does not include this primer, we offer different size primer bottles for sale.
Using 3M Adhesion Primer
3M Promoter is a powerful adhesion primer. You don't need a lot to make it work. A single swipe with a clean dry cloth on the surface you're mounting the light strip to is all you need. Once you paint on the promoter you have at least an hour to mount the light strip, although we recommend proceeding immediately after painting the surface with the 3M Promoter. The primer instantly bonds the 3M tape on the back of the LED light strip to the mounting surface. Once the 3M tape on the back of the LED strip touches a surface that has been treated with the 3M promoter, they will instantly bond together. You will not be able to break that bond without damaging the strip so make sure you have the placement where you want it the first time. There are no do-overs when using 3M Promoter and 3M VHB tape.
When mounting on the bottom of any vehicle we recommend making sure you are not mounting the strip in-line with the wheels or in areas that might be prone to a direct strike from road debris. While Boogey Lights® Hi-Intensity LED strips are made for motorsports applications, they will likely not survive a direct strike from a hard object. If you are concerned the LED strips might be hit by road debris due to their mounting location, we recommend using our Heavy Duty LED Strips which are better able to survive a direct strike from road debris.
If you're using our single-color LED strips, make sure you are not over-loading the circuit they are attached to. As with all lighting solutions, each LED strip should be properly fused. If for any reason there is a dead short in the strip, you want the power to that strip to be cut off to avoid over-heating and potentially burning.
Installing the Light Strip
The 3M adhesive we use on our light strips is SUPER strong. You do not need to press very hard to get them to stick. In fact, pushing too hard can damage the connector wires and LEDs embedded in the strip. Just a little light pressure is all it takes. Also, when affixing the light strip to the mounting surface DO NOT stretch, pull or twist the LED strip. Do not put tension on the strip itself. For example, do not allow either the power lead cable or the entire roll of LEDs to dangle while you're working on mounting the strip. The LED strip is not built to support lateral tension, twisting or bending. Simply unroll the LED strip in a straight line as you go lightly pressing the strip to the surface. The strip must be mounted flat against a contiguous mounting surface, in a straight line.
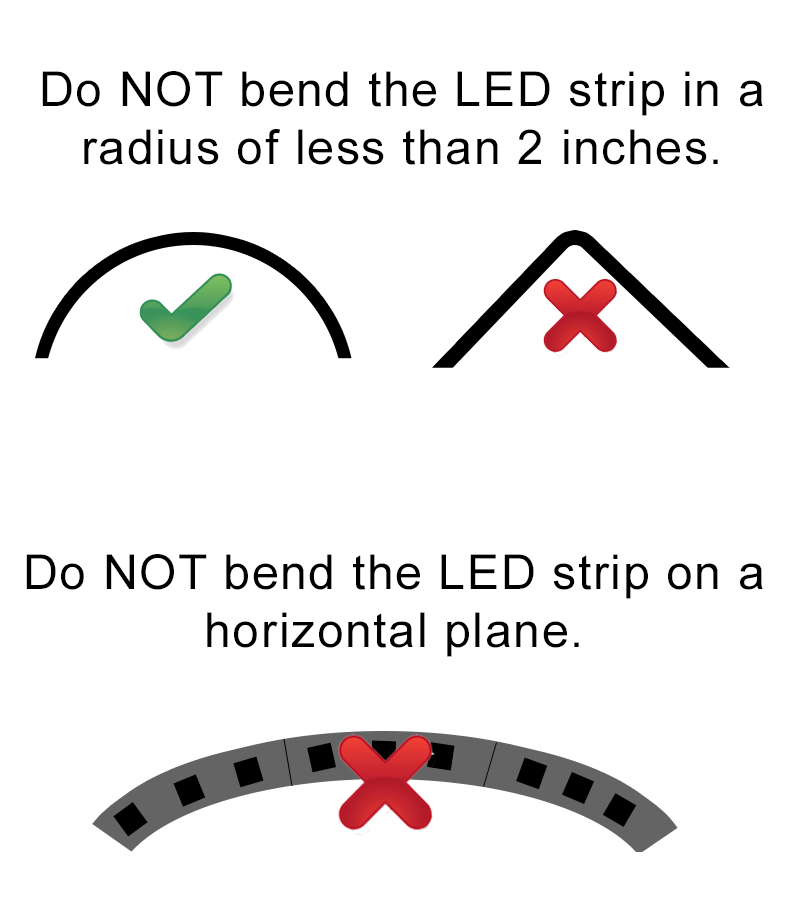
Really important too that the entire strip be stuck to the mounting surface and that you NOT attempt to span across multiple mounting surfaces. They must be mounted on a smooth, flat, continuous rigid mounting surface. Spanning two mounting surfaces on a vehicle that moves, flexes and vibrates will absolutely not work. The LED strip will fail and they will do so sooner rather than later; we can almost guarantee it. We know the temptation is there because it's easy/fast to do BUT you're going to be disappointed if you do. Mounting the LED strip across multiple surfaces will void the warranty as well. Also, do not attempt to mount the strip to follow a radius. The LED strip has to be mounted in a straight line. If you don't have a smooth, flat, contiguous mounting surface we recommend screwing or riveting 1.5" wide aluminum flat stock to the surface and then mount the LED strip to that flat stock. Also, do not attempt to mount the strip to follow a radius. Doing so will permanently damage the strip. The LED strip must be mounted in a straight line and flat.
Secure the Power Lead!
Secure the power lead firmly to the mounting surface. Do not allow the power lead to dangle, hang or move at or near the point where the power lead attaches to the led strip. This is very important. If you do, the led strip will almost certainly fail prematurely at or near that point which is not covered under warranty. The weight of that power lead coupled with the movement of the vehicle will eventually stress the connection point and cause the LED strip to fail. Securing the power lead to the mounting surface will stop that movement.
Bench Testing
Before shipping, we tested the lights and controller in your order to make sure they work. We strongly suggest bench testing the lights and controller before installing. Doing so will also help you understand the wiring setup. For shorter LED strips (under 300 leds), you can typically use a common 9vdc battery to test your lights if you don't have a 12vdc bench testing power source available. The lights of course won't be as bright but it is an easy way to test your lights before installing. For longer LED strips, you need 12vdc as 9vdc isn't enough.
Install Tips
Depending upon the mounting surface of your deck you may need want to consider using ALUMINUM CHANNELS. They make for a smooth installation as they can easily be screwed to the decking surface and then attach the light strips to them.
- WE STRONGLY SUGGEST BENCH TESTING YOUR LIGHTS AND CONTROLLER BEFORE MOUNTING! We cannot emphasize this enough. Probably 95% of all calls we receive from customers are about problems or issues that could have easily been avoided had the customer taken the extra 15 minutes to bench test their lighting setup before installation. Not only does bench testing give you an opportunity to understand the configuration, it also will flush out any problems or misunderstanding about the product and use before mounting.
- Make sure you know where your electrical connection will be and how you are going to route the power leads from the power source to your LEDs.
- The only way to ensure the LED light strip stays stuck is to make sure you prepare the surface in accordance with the directions. Every LED light kit we sell includes 3M promoter (aka "primer"). It's absolutely critical the surface be prepared using this special 3M promoter and that you follow the directions provided with every light kit.
- If you need to cut the LED strip, make sure you do it before affixing to your vehicle. Our LED strips can be cut every 3 LEDs and are clearly marked.
- When in doubt, call our technical support team! We're the experts. Since 1989 we've done this thousands of times. We know what works.
Need additional assistance? Give us a call and we'll be happy to assist!